Week 7
In the seventh week, we were taught about the scrolling background and the user interface so I decided to work on these two features of the game even if my job for the game was to create the enemies. I wanted to work on the scrolling background and the user interface because I wanted to develop my knowledge in C# and Unity.
Scrolling Background
I created a simple, easy and fast scrolling background which can be used for any type of 2D, action platformer game. For the background of the game, I chose the one which was used during the lab session in the seventh week.
When a picture is imported in Unity the texture type is "Sprite (2D and UI)", if I want to make the picture scroll I have to change the texture type to "Texture". I had to change also the Wrap Mode from "Clamp" to "Repeat" because I want to make the background a repeating one.
After I finished with the background changes I had to add a "Quad", to add a "Quad" the user need to go to the "GameObject" from there to "3D Object" and then add a "Quad". The next thing I had to do was to scale it, if the "Quad" is too dark for some user it can be changed by adding a "Directional light" (from "Game Object" go to the "Light" section and choose "Directional Light"), the last thing I did was to rename the "Quad" to "background". After I have done all of this I just dragged and dropped the background over the "Quad", if wanted the intensity of the light can be changed. After setting all the features of the background I started working on the script for the scrolling background.
The first thing I did in the script was to determine a "public float" variable, this variable will determine the speed of the background's movement. In the "Update" method I created a "Vector2 offset" which is equal with a "new Vector2", its components being the multiplication between the current time and the speed of the background and the value of Y. The Y value of the vector is equal with 0 because I wanted for my background to scroll on the X axis. The next thing I did was to write a "render" function which is equal to the "offset". Basically, the "offset" will be changed by the multiplication between the time and speed and in the final in will be added to the "mainTextureOffset" and the backgrounds will keep moving. To make the background move vertically just interchange the values on the "new Vector2" between them. The interesting thing about this method is that the background isn't physically moving, only the texture is wrapping around the background.
User Interface
For the user interface, I created a simple main menu with 3 buttons: one for playing the game, one for saving the game, and one for loading the last checkpoint reached by the player. For the background of the game, I chose a free asset from the Unity Asset store.

The first thing I did was to import the background into Unity to create a basic scene, then I started building the UI. The next thing I did was to create a new button, when creating a new button in Unity 4 different elements, including the button, are created: a "Canvas" which emulates the restriction of the user interface (everything which forms the UI needs to be in the "Canvas"), the actual button is created which also has a child (the text of the button), and the last element which is created is the "EventSystem" (the event system being a way of sending events to objects in the application based on input, be it keyboard, mouse, touch, or custom input). The next step was to create a simple menu, so I created 3 buttons, as I said in the beginning of the paragraph. The size, position and colour of the button can be changed in the Inspector window. To make the buttons look sharper, I "ticked" a feature in the "Canvas" window called "Pixel Perfect". For every button of the main menu, I did the same thing .

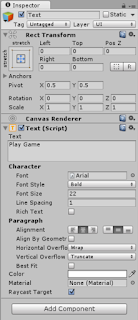
The font, font style, font size or any other characteristics of the text can be changed in the "Text" window.
The next thing I did was to make the buttons from the main menu work and by "work" I meant that I wanted for my buttons to change between some scenes. To do this I created other 3 different scenes for every button of the main menu. To change between scenes, I created a really easy script that has a function which changes the scene. This script can be placed either on the "Main Camera" or on the button itself but I chose to create an empty game object called "_Manager". In the script, the "Start" function is not needed and I renamed the "Update" function in "ChangeToScene" and I gave it a string value. Inside the function, I declared a variable which changes the scene. Basically, Unity is expecting a string value in order to change the scene. In order to call the function form, the button the function needs to be s public one.

The following step is to find the button and add the "_Manager" game object to the button in order to make it work. After I dragged and dropped the game object I had to choose from a list of different functions. I selected the "ChangeScene" then the "ChangeToScene". After I selected this I had to introduce the "string" which is the name of the scene.
Whenever I want to change between scenes I need to add them in the build window. So I went to "File" window I chose the "Build Settings" window (this window can be accessed with the Ctrl+Shift+B shortcut) and I need to add all the scenes, they can be added by dragging and dropping them into the window.
The final thing which I did for the main menu was to add an exit button in every scene in order to be able to return to the main menu, by using the same process.
References:
Scrolling Background: https://www.youtube.com/watch?v=HrDxnMI7pCc
User Interface:
https://www.youtube.com/watch?v=rsZM3q74Q2k&t=569s
https://www.youtube.com/watch?v=kQ2Qc_0MIyI


